Today is another day for sharing one of my old paintings. I did this a few years ago. I remember a friend of mine commented on this ‘This thing is more walnut looking than a walnut!’ which was so sweet.
While I was working on this piece, I was scared of darkening the shadows. When I was done, it was looking a lot more lighter, but my instructor warned me to darken the shadows and told me not to be scared. So I did what she said, and walnut turned into 3D all of a sudden.
Walnut_Watercolor_Graphite_Tulay Yilmaz_2011
I think what makes a painting the most realistic are the right application of the shadows and finding the right colors to paint.
I hope you like this painting.
Walnut is one of my favorite nuts by the way. I can crack and eat a huge bag of fresh walnut without even care a bit that it is coloring my fingers green. It is sooo yummy!
I am kind of busy on these days, I couldn’t work with watercolor pencils lately. Whenever I find time, I want to work on new pieces and share my thoughts about watercolor pencils.
Two days ago we had a huge storm in San Antonio. It was so strong that it shook the house. I love storms, especially in the comfort of a house but this one was a little bit extreme. Lightning and thunder was flying around. The best part about a storm or raining in such a hot climate is, you wake up to new flowers blooming in your garden the next day.
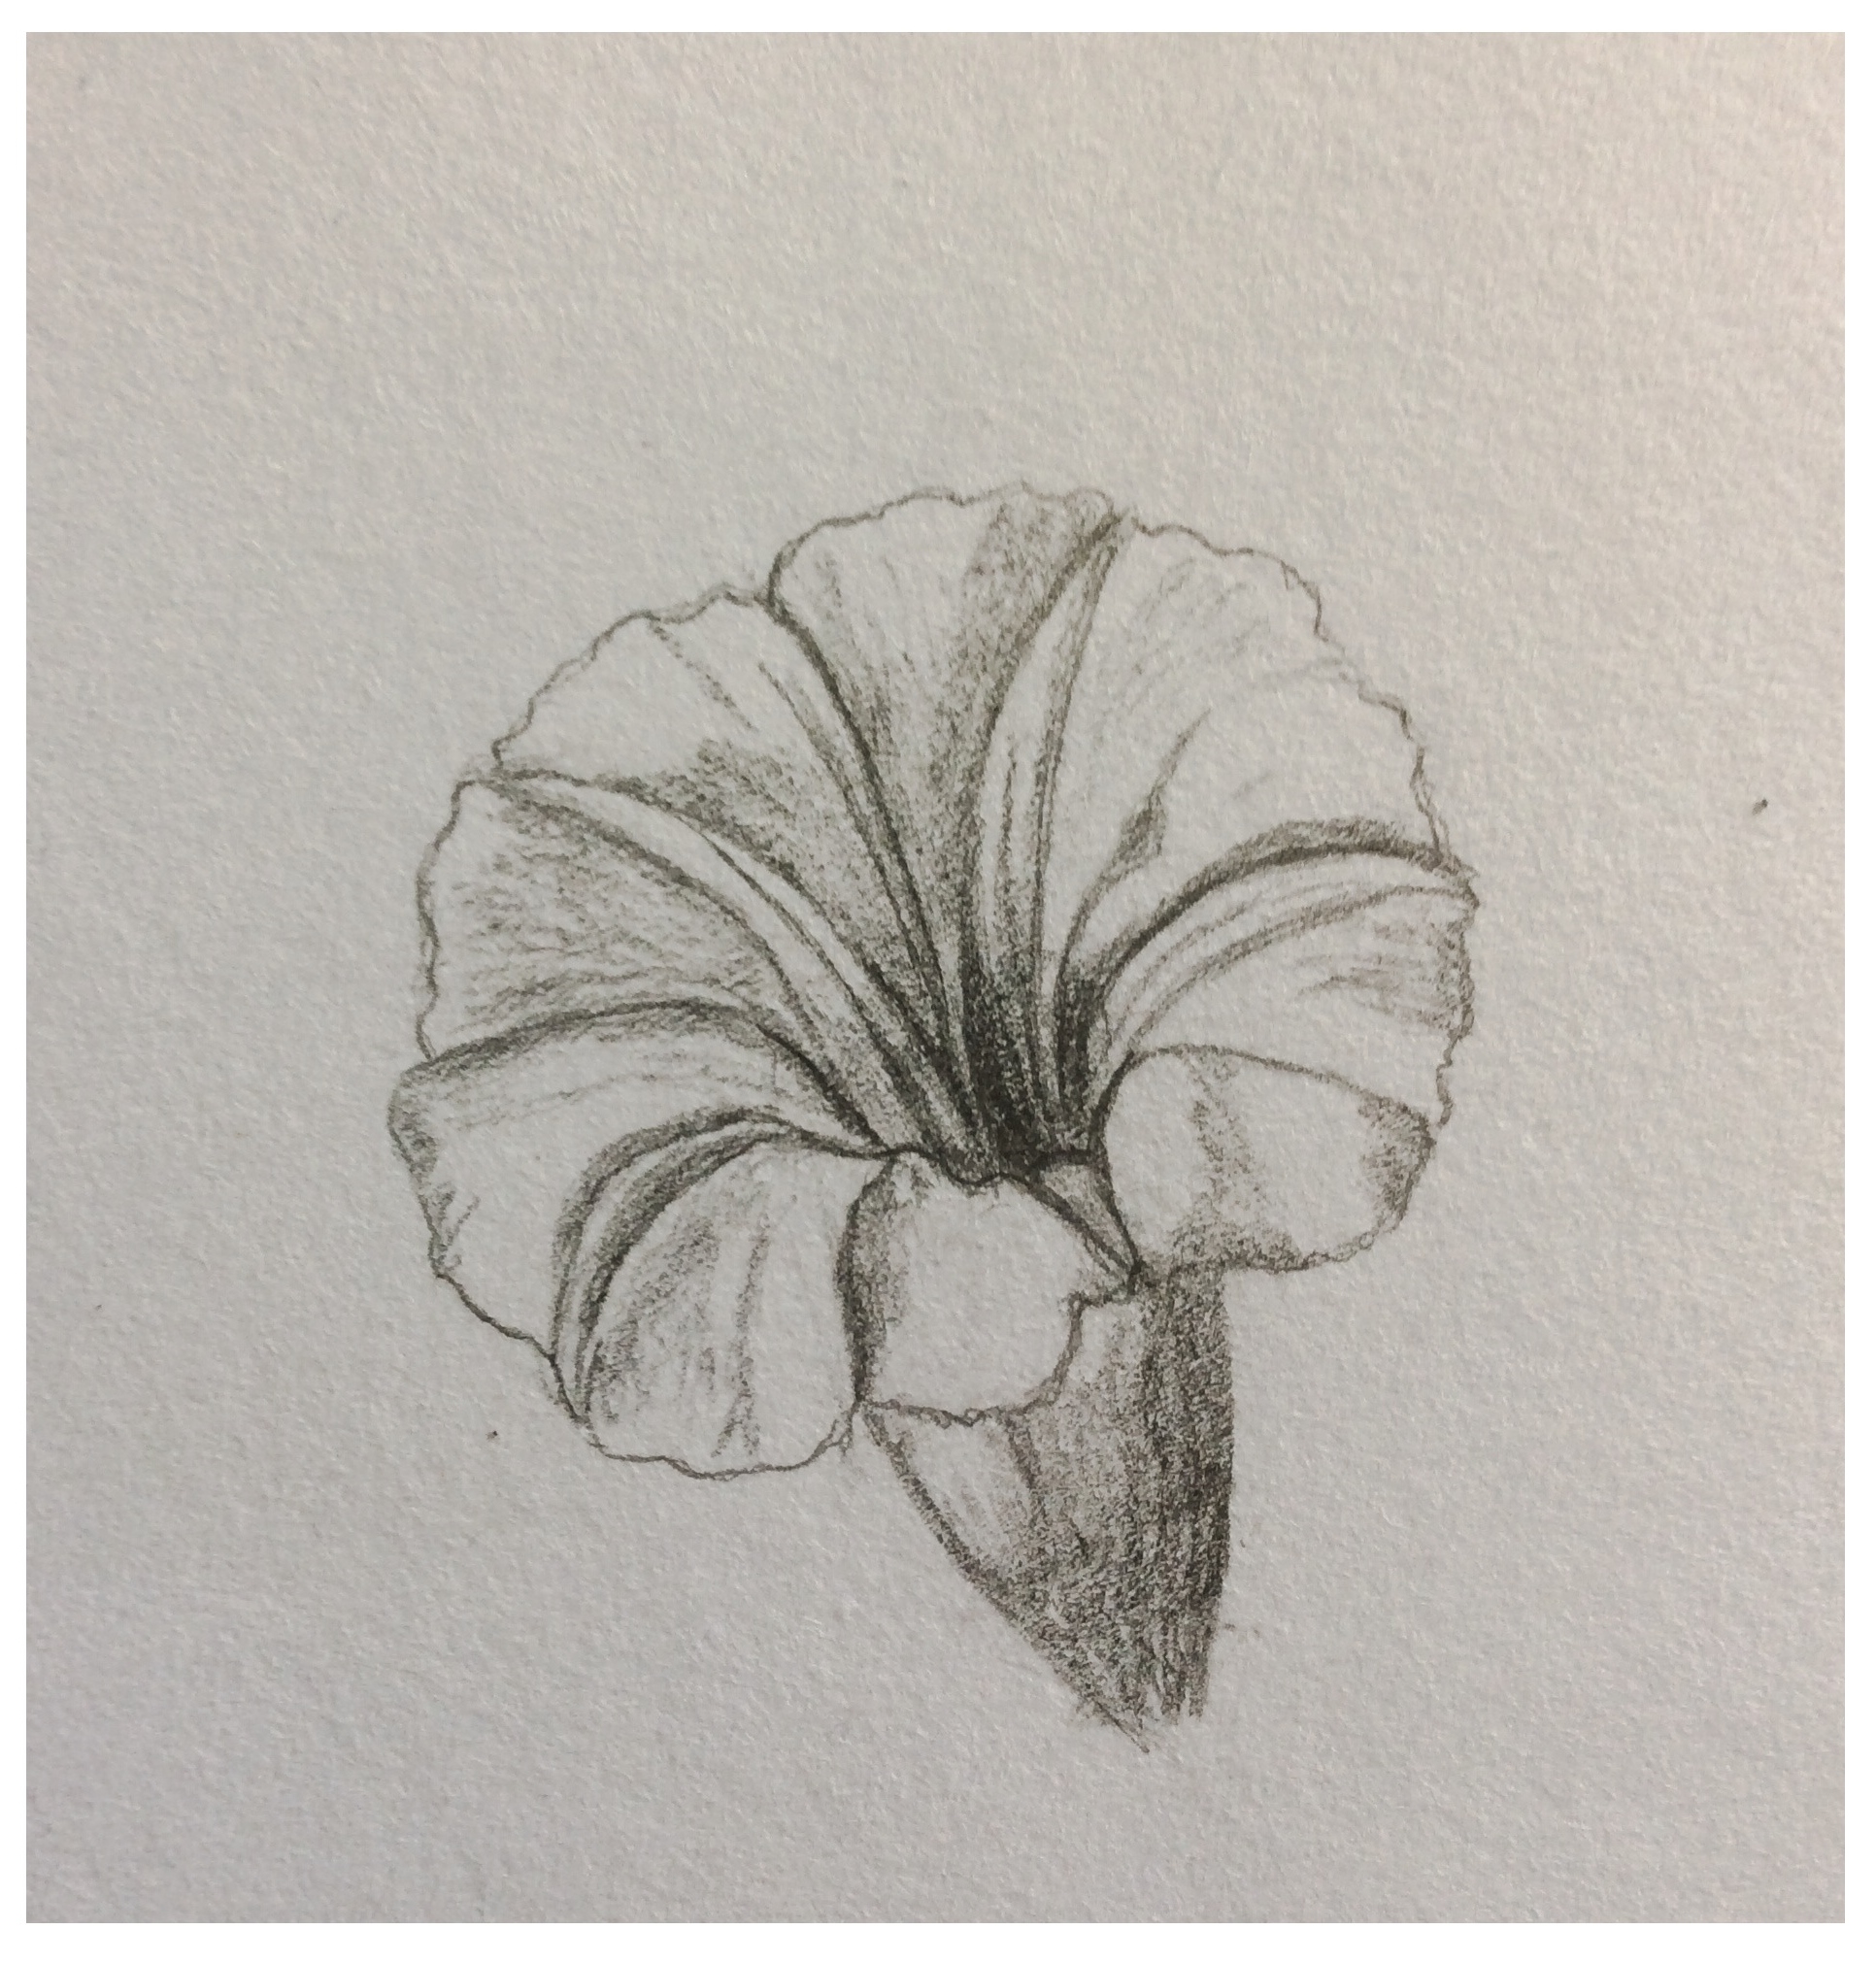
Yesterday I found a member of Convolvulaceae family creeping underneath the grasses. I believe it is called ‘Morning Glory’. When I saw it, I thought, ”Hmm tubular flower, how great to find you especially on these days that I don’t want to draw anything.” Tubular flowers can be really tricky, because you need to give the sense of depth.
I took the flower and drew it around 2.30 pm. Its petals were open. I looked at the flower and realized a star shape in it. You can see that distinct star shape from this lovely photo taken by Beto Frota, I found on Flickr;
This star shape helped me to follow the symmetry of the flower and made the drawing easier. Here how it looked when I was done;
Morning glory_Convolvulaceae_Graphite
In the evening I saw its petals were closed, so I also drew it that way too;
Morning glory_Convolvulaceae_Graphite
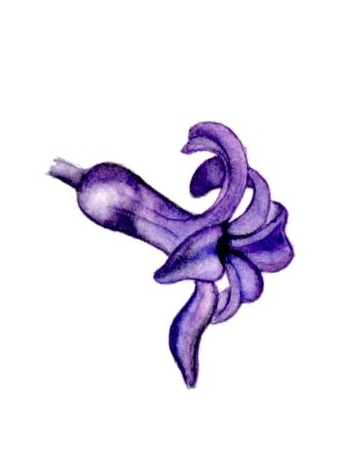
I also found some old paintings that I did with purple Hyacinth. They are also tubular;
Hyacinth_Watercolor_Tubular flower
As you can see in all these three drawings, darkening the center of the flower has a great importance to give the depth to the flower. If you want to challenge yourself, you should try to draw a tubular structure as well.
Yesterday I went to library and got a book named ‘Painting flowers in watercolor’ by Coral G. Guest. I looked through the pictures yesterday and was surprised to see despite the fact that the drawings were not that detailed, the painting turned out amazing. I can’t wait to read the tricks. If I feel convinced, I will try it and share here.
Yesterday, on the way back home, I found a fruit of a Rosaceae family member which was looking pretty cute. I and Paul (the love of my life) collect little fruits or seeds of the plants and put them in a jar; they look super cute and also help us get familiar with the Texas vegetation. I was thinking this one will be nice for the collection and also I could paint it. It was small enough that would help to wake my sleeping motivation up and help me be more productive. I don’t know why but my motivation to paint something is zero on these days. Some botanical artists claim that you don’t need motivation to paint; all you need is start painting. Anna Mason is one of them. (I love her work by the way.)
What she says may be true for people who are already painting professionally and know all the techniques, tricks and have the right equipment that would enable them to have a smooth painting process. For me, I need to be willing to sit and paint something; otherwise I just ruin some parts of the picture and don’t even bother to fix them.
Last night, I wasn’t in the mood to paint again but forced myself to draw the fruit I found. I did it with colored pencils and this is how it looked at the end.
Rosaceae Fruit_Colored Pencil
When I took the photo and checked it on the computer, I saw the colors didn’t blend that well on the paper. It was looking okay on my paper, but here on the screen it doesn’t look that great. Maybe this can be a way to look at the details on your drawing and fix the problems on your paper. I assume with a different type of paper and colored pencils with more pointy ends, it would be easier to fill the gaps and blend the colors better. The use of a magnifier would also help to see those gaps on your paper too.
Seeds and Fruits_Colored Pencil
After I finished the fruit, it looked so lonely on the paper. I decided to choose some other fruits and seeds from my jar and draw them. The red one is Mountain Laurel seed. They are so red and beautiful. We have another jar filled with only with these seeds. I don’t know why but I drew the red seed and the yellow fruit, black and white at the beginning, then I colored them. That’s why that yellow fruit looks unnecessarily shadowed (:
I need to find a better way to take pictures of my paintings. One photo doesn’t look like the other even I take them at the same place and at the same time; the light keeps changing. If you have any suggestions I would love to hear. Another thing I need to learn is how to use Adobe Photoshop. I am not in favor of changing the colors of my painting on Photoshop, I think it kills the originality of a hand-made product but cleaning the dirt from the surrounding of the painting would be nice.
I feel terribly guilty that I didn’t complete the assignment on time. I’m not planning to list my excuses why I didn’t complete but I should mention that I’m really sorry. It seems setting certain time periods won’t work for me. Future assignments won’t be restricted by time. I was hoping doing this would push me to draw every day, but … You know what happened
Anyways, last night I have finished another piece which I am really happy about. I picked a really lovely Magnolia photo. I drew it by looking at it as I did on the previous ones of this assignment which took plenty of time. When I was confident about all parts looked set, I started coloring it with colored pencils again.
Colored pencil is a really nice media; I am having so much fun while coloring with them. I don’t have a professional set of colored pencils. I am still using little brother Ryan’s Crayola 24 pieces colored pencils. Since I am not completely into colored pencil use, I am not planning to buy a whole professional set yet. Maybe in the future!
While I was drawing and coloring last night, my background music was Coldplay Live 2012 album which is pretty amazing. I would suggest you to try to listen while painting. Princess of China is my favorite.
It was a hard piece, there are some little parts that still didn’t really align with the original photo but I am satisfied with it.
Hope you like it! Now there is one more left to complete the assignment. I will try to release it as quick as possible. Then I’ll write why this assignment is helpful. Thank you for your patience.
I have just completed my third product. It took my half day but it looked really nice at the end.
I am aware today was our last day to complete the assignment but I had a busy week, I couldn’t spend enough time drawing and I didn’t anticipate that this assignment will be this hard and time consuming. Therefore I am giving one more week to complete two new products. I am sorry for being lazy. I’ll try to make it up.
I picked Digitalis purpurea this time. I accidentally found the picture online and I fell in love with it. Original of the picture was painted by Arthur Harry Church (1865-1937). If I need to describe his work with one word, it is AMAZING! They are so delicate, so accurate and so beautiful. I encourage you check him online to see his great paintings.
My drawing went so well today. Normally I don’t use guidelines that much when I start drawing but this time I did lines, I drew a frame, I did circles to arrange the places of the different parts, I kept my lines really faint and etc. This is an improvement for me because I normally start from one point and build up slowly which was always ending up with a good looking picture but not a totally accurate one.
This time, different than the other two products of this assignment, I didn’t fix the non-matching lines. I pushed myself hard to catch the accuracy as much as possible. I completed the whole picture, colored it and then compared it with the original copy. You can see below how it looked at the end.
Matching lines with the copy of original painting
When I was done, I colored it with colored pencil again and tadaaaa…
My second piece is ready. I didn’t expect this exercise will be this much time consuming but it is.
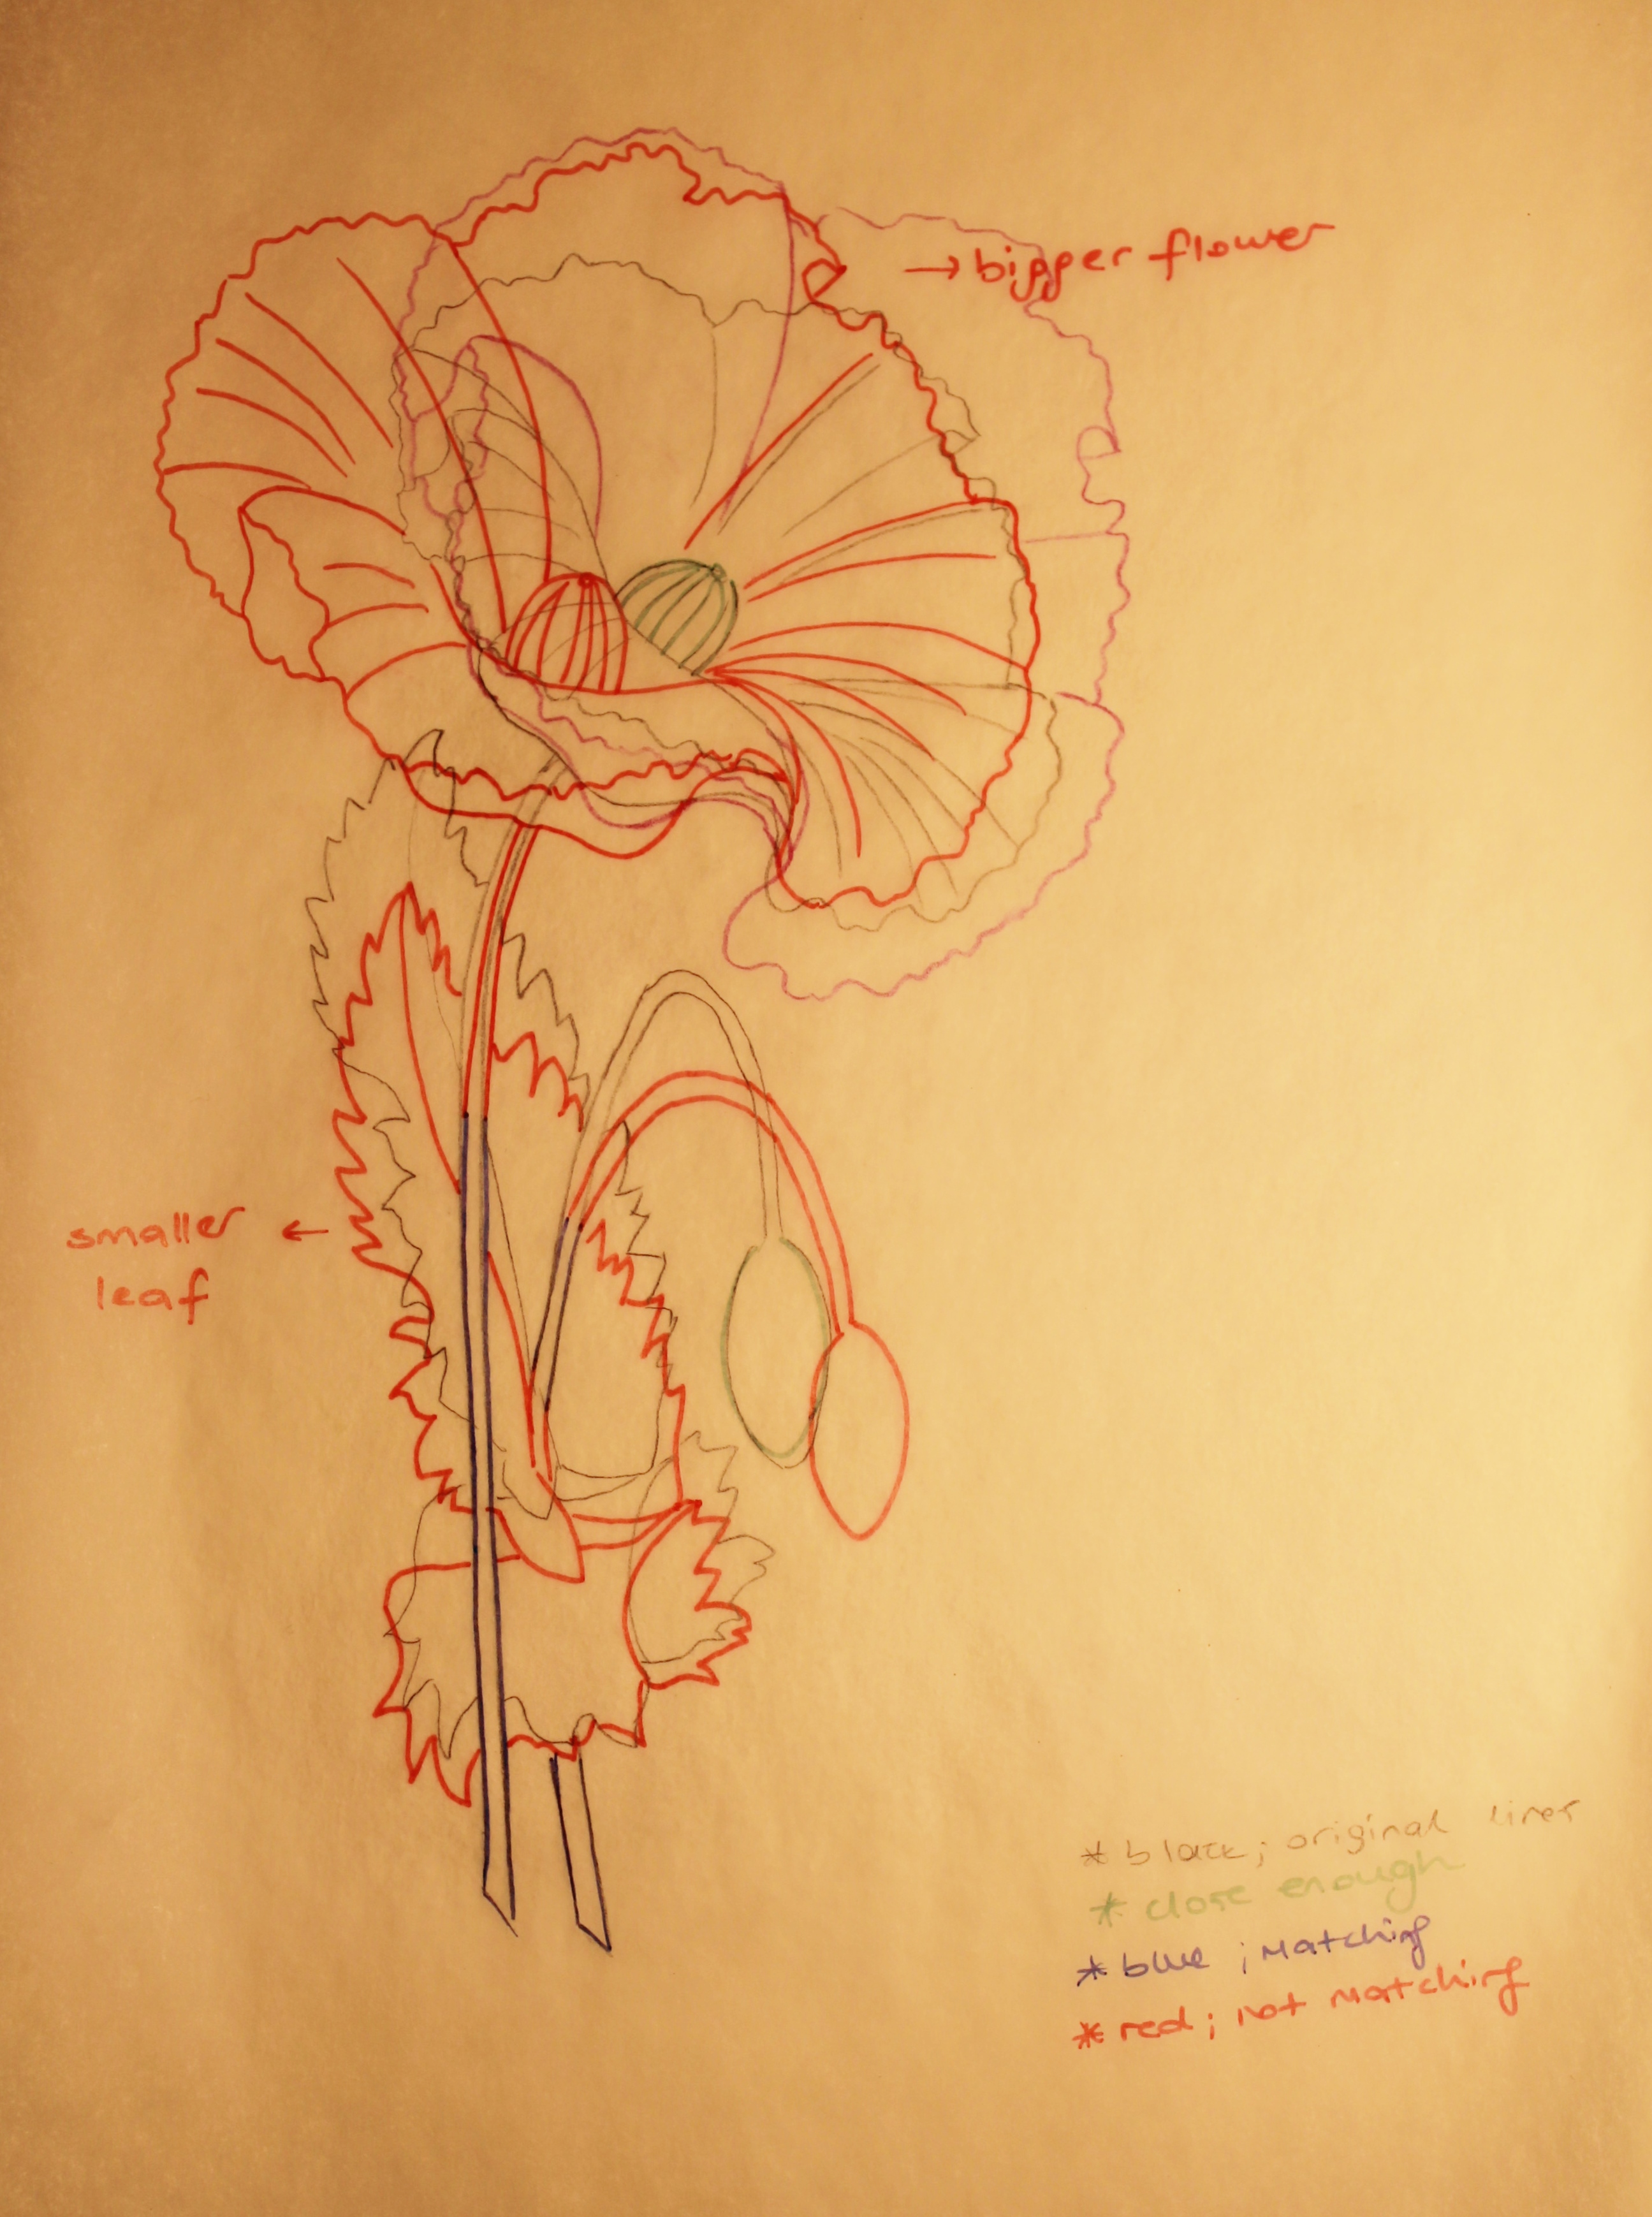
I have picked Papaver somniferum this time. It was hard and confusing. I still have the tendency to draw the things bigger than normal. The angle also ended up being different than the original. Instead of changing the angle of the pieces, I only focused on their sizes this time. Therefore, my final picture is slightly different than the original one.
Matching and unmatching lines and more
As you can see above, it was like a mind game. It wasn’t the best idea to draw all the lines on the same sheet, even being in different colors didn’t really help. Next time I’ll try to make it less confusing both for you and for myself.
After a few hours and with the help of little brother Ryan’s colored pencils, I finished my piece.
Since the angle changed, the top of the leaf remained hidden behind the flower. I am happy with it so far. I only wish I didn’t use Strathmore Drawing paper for this. Its texture was not the best for colored pencils. I need something smooth. I will use mixed media, vellum surface next time.
I am learning a lot during the process. I highly recommend you to try this exercise. Please leave your comments, suggestions… See you on the next one!
I have completed my first product from our second assignment on a boring, gray, rainy day of San Antonio.
I should admit that I had questions in my mind how this exercise would really help me to improve my drawing but today I realized it definitely helps. I will gather all the benefits and publish them as another post at the end of this assignment.
I picked Tulipa sylvestrisfor my first drawing. I pasted it to a word file, and resized the picture. Trick is holding ‘Ctrl’ button while resizing not to distort the picture.
Then I started drawing the flower on my paper only by looking. I didn’t use any ruler, protractor, or anything else. I was pretty confident while drawing. It was looking nice and correct. When I was done, I copied my picture to a trace paper and put it above the print to see how my lines were aligned.
Matched and unmatched lines
As you can see on the picture above, black lines are my drawing. Red lines are the ones which don’t match with the original picture and blue ones are the matching ones. Not much, right? And besides my Tulip turned out chubbier than the original one and its leaf was way off from where it was supposed to be.
I put the trace paper to my side to guide me. I deleted my wrong lines and fixed them section by section on my paper. When I was done, I put the trace paper over it again just to see the end result. It wasn’t perfectly aligned still but it was good enough. Then I found myself coloring it with dry pencils. It wasn’t planned, and the colored pencils were not the best kind either but at the end it looked simply pretty. Here is the result;
After I explained my own style for line drawing, I wanted to give some time for the people who wanted to try my method before I set the second assignment. Hopefully you found it useful. I know it is boring to line draw compared to water coloring but it is a very crucial process for nice final products. Therefore, try to be patient. After a while it will get easier to sketch the flowers because you’ll get more familiar with the symmetry of the petals or the structure of the different plants.
I really thought over this second assignment if it had to be a shading assignment. However, I didn’t want to start shade and light games on our subjects right away because I wanted to make sure we all feel confident about our sketches first. If we can’t draw our plant properly and accurately, it won’t help to know how to shade it. I found this exercise on a book named as ‘The Elements of Drawing in Three Letters to Beginners’ by John Ruskin M.A. I didn’t read the whole book yet but it is easy to read and makes sense. If you are interested in it, you can find it online and download it free.
On this assignment, we will draw plants by only looking at pre-painted flowers. We’ll use this link as a source:
Clicking on one of the images we like and enlarging it.
Copying the picture and pasting it to a word document.
Enlarging it up to a point that we won’t ruin the quality of the picture or the details.
Printing that picture.
Putting the picture in front of us and starting to draw the same exact flower to our own paper without using any ruler or protractor.
We’ll examine the keenness of our sight and how accurate we are drawing without using any scales. It will also help us to extract our final product from a mess of lines. When we are done with our drawing, we’ll copy the picture we drew with a trace paper and put it above our print to see how good the lines are aligned. If there are lines that don’t match, we’ll correct them on the paper we were working on.
The exercise on the book takes it even further and wants you to go over your outline with a quill pen. I’m not planning to do this but if you want, just leave a comment then I can share the details for this part of the exercise.
For this assignment we will work on 5 different plants from the link I shared above. If you find another source with better paintings, go ahead and use them. I didn’t want to change the instructions in the book, that’s why I shared that link.
Time table. Assignment should be completed in 14 days.
We will have 14 days for this assignment to complete. It is plenty of time, so if you want you can draw more than 5 plants. Please keep your final products safe and clean, we may use them for another assignment later.
I am waiting for your drawings, ideas, suggestions and questions… Have fun and stay in touch!
Thank you for your support, I’m glad I’m not talking on my own here, but also have some audience there. Today I’ll try to explain my line drawing process step by step.
First step, Pick up your subject!
There are things you need to consider in this step. Be aware of your talent and capability of doing things. Ifyou start with a subject which is extremely hard for you, you can end up feeling frustrated and quit drawing before improving even a bit. Therefore, instead of picking the prettiest material with bunch of curves and details, go with a plant which has less complexity.
Other thing is finding a material that will inspire you. You need to feel excited about your subject. Otherwise, it doesn’t matter how hard you push, it takes longer time to finish what you started or maybe you won’t even finish it.
When you find your inspiring subject, inspect it really well. Look at it from different angles. Look where the different parts of the plant are starting from and where they are going. How are they attached? What angle it looks the best? Will you include all the leaves? Will you draw all the flowers? Or is it better to cut some of them off to prevent the mess and confusion on your picture?
Second step, Set up the drawing environment!
Clean your table! Wash your hands! Clean environment is the best for starting a new drawing. This is what I prefer at least. If you are not working on a dry leave or branch, you need to put your subject into a bottle, jar, or whatever works for you which are filled with water. Then place your plant in it and put it right in front of you with the angle you desired. It helps to put a white panel behind the plant to focus on your subject better by separating it from the mess of the room (you can simply do it by folding a big white paper from the middle, you can partially see mine on the picture below).
Third step, Prepare your equipment!
Paper, pencil, eraser, ruler and pencil sharpener. They are main utensils that I use but it can be increased in number like many professionals do. You can use several different pencils or use sandpaper instead of pencil sharpener vice versa. I am sure there are also other millions of things that I am not even aware of but these basic materials are enough for a start. However, for my technique, I use a protractor. Therefore, this is one of the materials I won’t ever give up using.
Fourth step, Scaling/Measuring!
This is the part where the things are getting harder and confusing because we need to deal with perspective in this step. I have never been in an art school, so I can’t make good definitions for perspective or depth perception. However these are really important when you try to achieve realistic pictures because they give us the visual ability to perceive the world in 3D. You need to reflect this to your paper by scaling and measuring several times.
What I do is take the measurements from the plant by my protractor without touching the plant from the same distance every time (e.g extending my arm for every measurement). Another main thing is closing one eye for every measurement. When you look with both eyes, everything overlaps and becomes more confusing. However, you need to do these while you are working with your material from a distance. If you are holding your plant in your hand or putting right next to you, just go ahead and take the measurements by your ruler or protractor by touching your plant.
What you need to do for seeing the distances between different parts of the plant, you need to imagine your subject in several geometrical shapes. Lines, triangles, spheres, circles and vice versa. They help to measure the distances. I put a picture below to make it clear;
Geometry on the plant
After taking the angles, I am keeping the angle, and placing it to my paper and putting little dots for each end of the protractor. Then if I feel confident about my measure and the angle, I draw the part that I am working on. Otherwise, I measure again.
Fifth step, Complete your drawing!
Fourth step can be a long process and be frustrating. Try not to put too much pressure on your pencil while drawing, because you may end up ruining your paper by eraser. Make it visible enough. I heard people doing the initial lines with light blue pencil, than going over with black graphite. I never tried, but if you want, just go ahead. When you are satisfied with the proportions of your plant, make your lines even more visible, and get rid of the old traces.
Last step, Take your paper into your hand and smile! Well done!
Tips:Deciding a center and drawing a faint line to your paper may make it easier to see the distances of the parts of the subject and help taking the measurements better. (If the plant is tilted, your center line will also be tilted, don’t forget to consider this.)
Using a ruler and a protractor interchangeably helps a lot. You don’t need to stick on only one of them.
It is good to go back and forth to take the angles several times not to make mistakes.
If you have hard times to imagine triangles, work on drawing smaller or less complex materials first instead of flowers.
Don’t feel sad if your piece doesn’t turn out well, this is a process you improve by experience. Keep working on it.
Don’t take my words as rules, art is something personal. Feel free to find your own style and way to do it!
Thanks for your time reading this article. If you think something is missing here, please leave a comment or lead me to a link that I can read about. I hope you enjoyed these instructions. Feel free to comment and stay tuned for the next assignment!
I have completed my fourth and fifth line drawings. I have things to say about the fourth one. First of all I watched a bunch of illustration videos on YouTube three days ago. Everyone has their own style it seems. I wanted to extract the ideas that I find useful and to try them in person.
I know I wasn’t supposed to be doing the water color but one of the illustrators claimed that vellum paper is great for water coloring. I felt curious. What did I do? I went to Hobby Lobby and bought Strathmore mixed media vellum surface, 140 lb, 15 sheets, pad of paper. This was the only one which was hot pressed and smooth surfaced. I was hoping that it will turn out well. Guess what? It didn’t. Because water color doesn’t move on the paper, it was soaked so fast that there was no way to lead the color you put on the paper.
Another idea from another illustrator was taking macro pictures of your subject from several angles, and then turn your colorful pictures into gray scale to be able to see the highlights and shadows better. After that you start painting from an iPad or a computer. She thinks we need to use the technology to make illustration easier. I don’t think the same, I think we need to work from real material but her illustrations were so realistic and nice that I thought maybe she was right. Therefore I gave it a try. I found one of my macro photos of Hibiscus flower that I took before. I put my new paper (vellum one) to work on, and I started drawing. Everything was going all right until I started water coloring. As I mentioned above, vellum paper didn’t work for me.
I didn’t like working from the photo either. Photos are so flat; it is hard to visualize the subject in 3D. It is better to work with the real material and the photo at the same time. Anyways, my main mistake was trying all the new things at once. Here is the result;
Hibiscus flower_4th Line drawing
I definitely didn’t like it. I didn’t want to work on it any longer. That would be waste of my paints. Maybe one day, I can complete it just because. I don’t like leaving incomplete works behind me.
Today I turned back to my own style to do my last line drawing. We were out; I saw the flower next to the access road. I got a couple and when we reached home I started drawing. I don’t know the species of the flower but it is from Fabaceae family for sure which can be decided by the flower structure (typically three distinct parts; banner, wing and keel). Here’s how it looked at the end;
Fabaceae_5th Line drawing
I am happy with this one.
Pihhuuvvvv… I have completed my first assignment. Tomorrow I’ll try to explain my technique in detail for all these drawings and I’ll set another assignment for us.
Please share your drawings with me, and feel free to comment!